
Prerequisites
Before setting up Braze integration, ensure the following:
- You have an active Braze account
- You are signed up for a Reactiv Plan.
- Your Reactiv Mobile App is already set up and functioning.
Step 1: Access the Integrations Page
- Log in to your Shopify admin dashboard.
- In the left-hand menu, locate Reactiv - Mobile App Builder under the "Sales channels" section.
- Click on Reactiv - Mobile App Builder to open the Reactiv dashboard.
- Select Integrations from the sidebar.
Step 2: Locate Braze
- On the Integrations page, use the search bar or scroll to find Brazeusing the search bar.
- Click the Connect button next to Braze to access the integration settings.
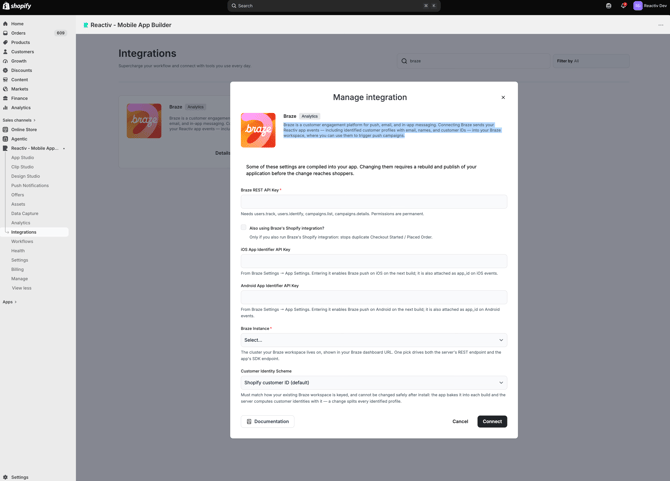

Step 3: Connect Braze to Your Mobile App
In the Braze integration popup, you will see a field for the App Token.- Braze API Key - Needs users.track, users.identify, campaigns.list, campaigns.details. Permissions are permanent.
- Select the checkbox if you are also using Braze's Shopify integration (prevents duplicate checkout events from being sent)
- iOS App Identifier API Key - From Braze Settings → App Settings. Entering it enables Braze push on iOS on the next build; it is also attached as app_id on iOS events.
- Android App Identifier API Key - From Braze Settings → App Settings. Entering it enables Braze push on Android on the next build; it is also attached as app_id on Android events.
- Braze Instance - The cluster your Braze workspace lives on, shown in your Braze dashboard URL. One pick drives both the server's REST endpoint and the app's SDK endpoint.
- Customer Identity Scheme - Must match how your existing Braze workspace is keyed, and cannot be changed safely after install: the app bakes it into each build and the server computes customer identities with it — a change splits every identified profile
Step 4: Verify the Integration
- Save and publish. Enabling or changing Braze settings requires a new app build to be published before the change reaches shoppers.
- Once you have downloaded the new builds, you can test sending push notifications and setup push campaigns in Braze.
Troubleshooting
If you encounter issues during the setup, please contact our support team via chat or email.
📝 Always save and publish your work in the dashboard before checking the mobile app.